Build a RimWorld Killbox That Still Works (1.6) | Layout + Turret Planner
RimWorld has no killbox building. You make one with walls: seal the base so a normal raid has one open path, bend that path twice so nobody inside can be seen from outside, then let the path open straight onto your firing line. In 1.6, raiders can stop and shoot from a sandbag or barricade, so the old sandbag-on-the-corner trick is gone. Leave the exit bare, line your shooters up facing it, keep chain shotguns inside 12.9 tiles, and space turrets so one blast can't take out the line. Sappers, breachers, drop pods and sieges won't use the box, so plan for them separately.
PC 1.6.4871 · Base game · Unmodded · Updated October 7, 2026
Watch on Open.Video · English audio
How to make a killbox in RimWorld 1.6
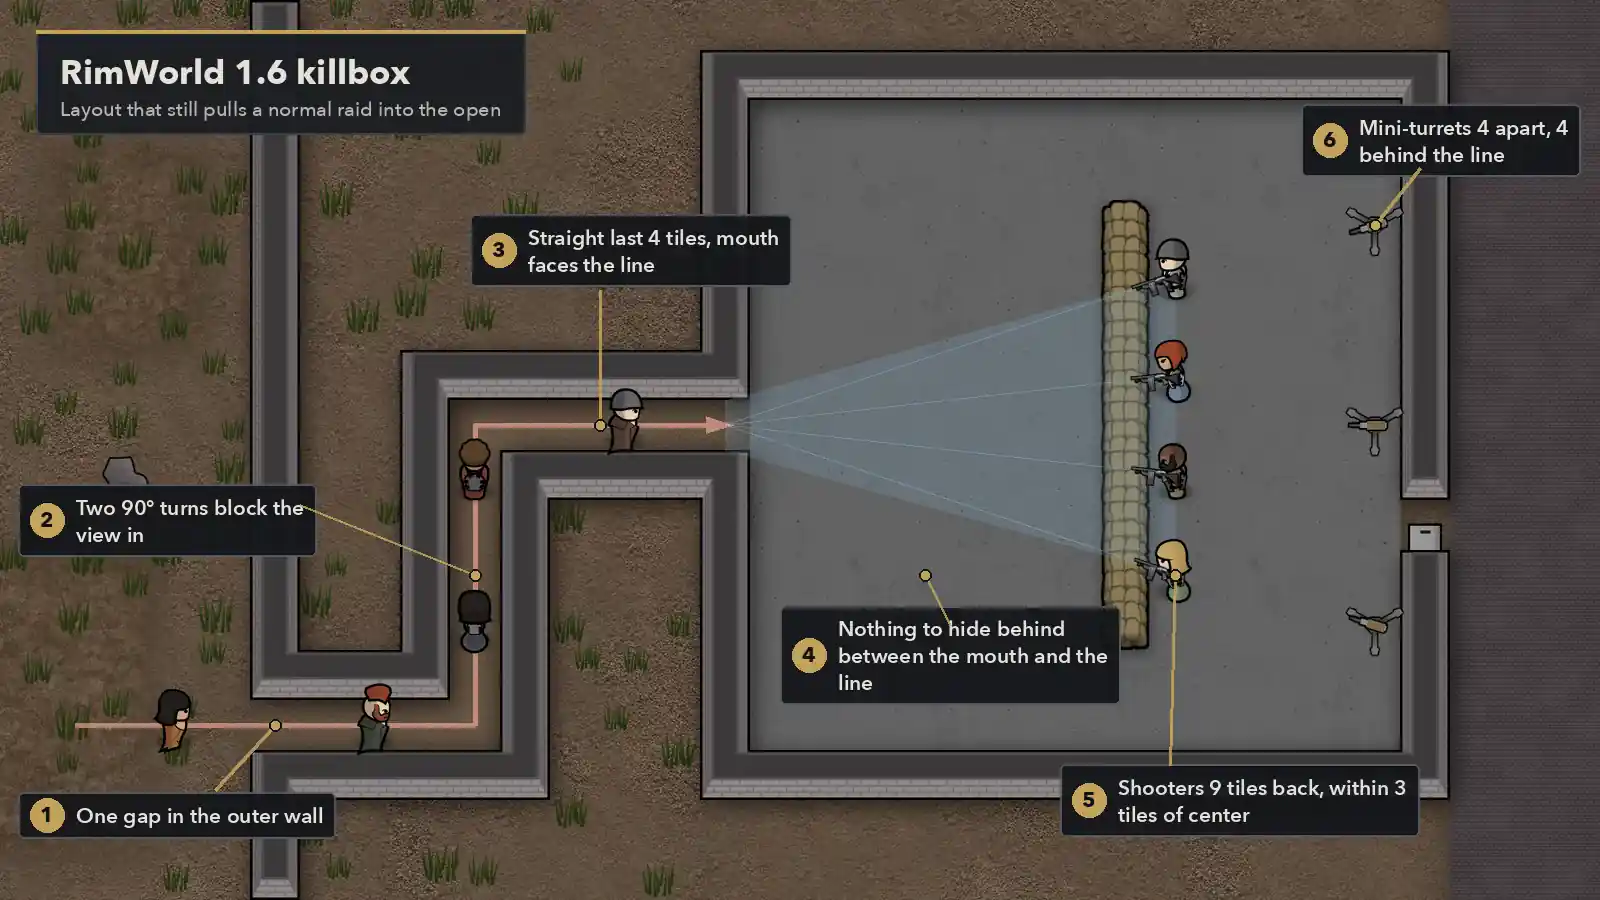
A normal assault raid picks a colonist, walks the shortest route it can, and starts shooting as soon as it finds a tile with a clear shot. A killbox controls both halves of that: the only route ends in your kill room, and the first tiles with a clear shot are in the open, in front of your guns.
- Close the perimeter and leave one gap. Raiders can't open your doors, so closed doors are just walls to them. A door set to hold open is a gap. Stone or steel walls; wood walls burn.
- Run a one-tile tunnel with two 90° turns. The turns stop raiders from seeing in. A raider who can see a colonist from outside will stop and shoot from outside.
- Make the last 3 or 4 tiles straight and open them into the kill room through a one-tile-thick wall. That doorway is where raiders will try to stop.
- Keep the floor bare from the doorway to your line. No sandbags, chunks, fences or turrets. Anything on the tile next to a raider is cover for that raider.
- Put the firing line straight across from the doorway, inside your weapon's range. Chain shotguns at 8 to 10 tiles, rifles farther back. Keep every shooter within about 25° of the tunnel's line, which works out to a sideways offset of just under half the distance. Sandbags go directly in front of your shooters.
- Put turrets behind the line. Mini-turrets 4 tiles apart and 4 tiles behind your pawns. Nothing fragile within 6 tiles of an autocannon's lower-left tile. Flip them off between raids.
- Give colonists their own door into the room from the base side, closed. Raiders can't use it.
- Keep a second plan. An indoor fallback hall for drop pods and a reaction team for sappers and breachers. See raids it won't catch.
What the example layout costs
The layout in the picture: a 1-tile tunnel cut through an existing outer wall, a 13 × 13 kill room, 4 shooters, 3 mini-turrets.
| Part | Amount | Material | Work |
|---|---|---|---|
| Tunnel and room walls | 82 tiles (28 tunnel, 54 room) | 410 granite blocks, or 410 steel | about 77,900 in granite, 11,070 in steel |
 Sandbags in front of the line | 9 | 45 cloth or leather | 1,620 |
 Steel mini-turrets | 3 | 300 steel, 9 components | 5,400 |
| Colonist door | 1 | stone or steel | small |
The turrets draw 240 W while switched on, and a full barrel refill for all three is 240 steel. Steel walls go up roughly seven times faster than stone; stone walls have more hit points.
Running a raid through it
- When the raid arrives, switch the turrets on and draft the line onto their marked tiles before the first raider reaches the second turn.
- Let raiders come through the doorway. Shooting into the tunnel early can make them stop in the bends and look for a firing spot.
- Keep one or two melee pawns beside the line, out of the doorway's view, for anyone who survives the walk across the room.
- Afterwards, repair the turrets first. A turret below 20% hit points that can explode lights its fuse the next time it's hit.
Cover belongs on your shooters. Slowdown, if you want it, stays in the outer tunnel, never on the last few tiles before the room. Sandbags, barricades and chunks all slow raiders down, and they also give cover to anyone standing next to them.
Why raiders camp the corner in 1.6
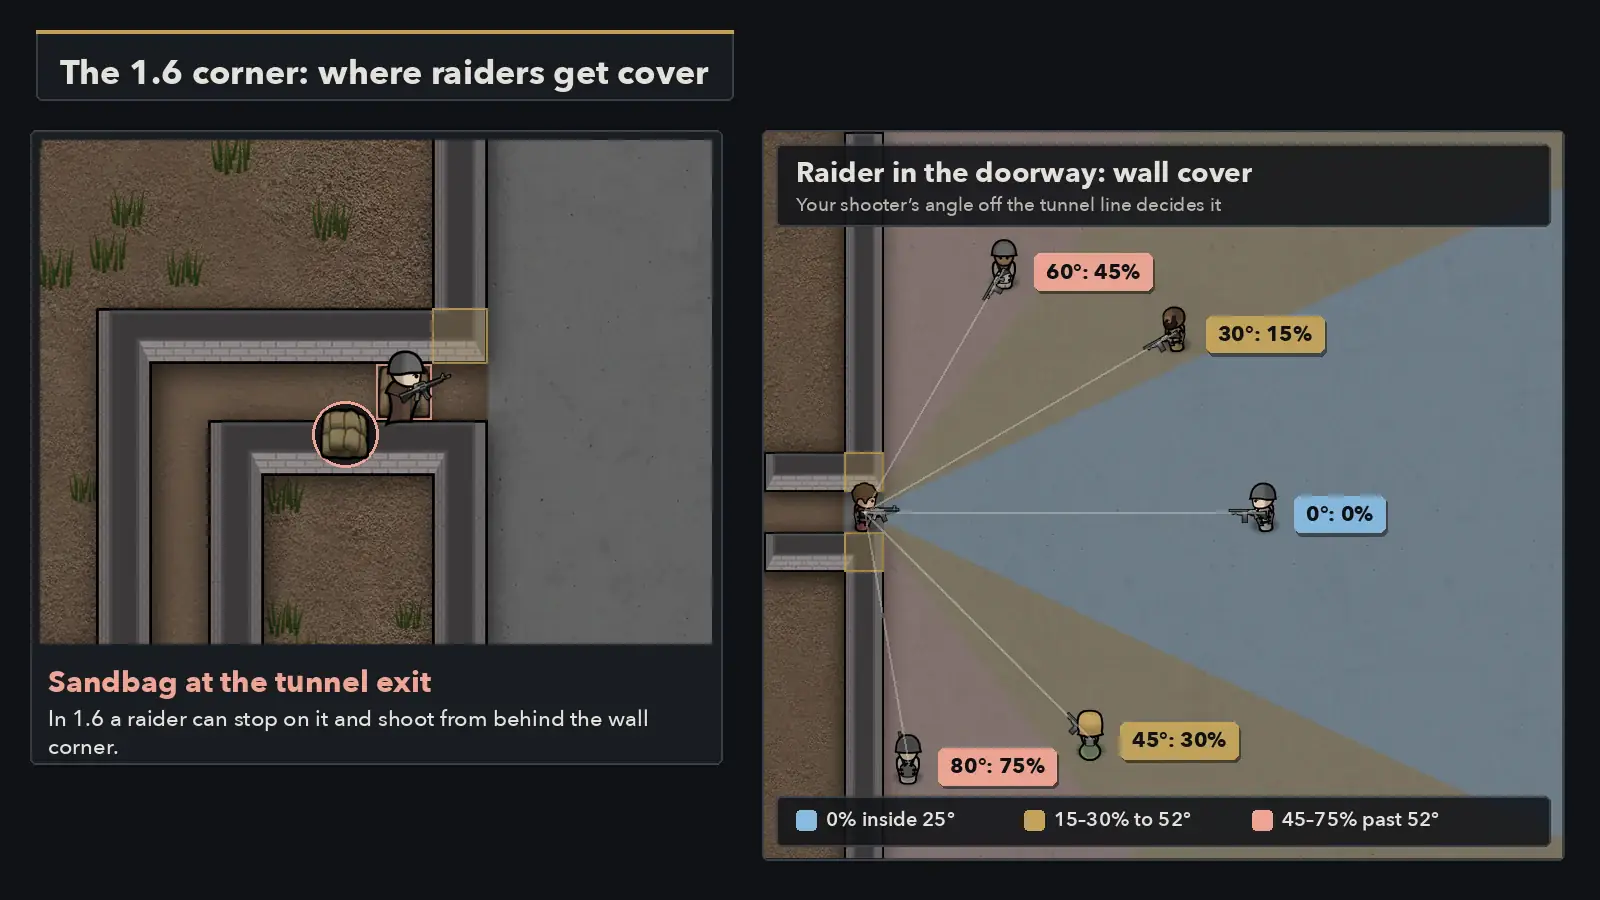
Older killboxes put a sandbag or barricade line across the exit. Raiders couldn't stop on those tiles, so they had to keep walking into the open. In 1.6 a raider can choose a tile with a sandbag, barricade or any other walk-over object as a firing spot. They rate it lower than a clear tile, but if it's the best spot with cover, they take it and shoot from there. The RimWorld Wiki's killbox diagram with a T-shaped fence line at the exit predates this change, and its own banner says the page needs a 1.6 update.
How cover is worked out
Cover only comes from the 8 tiles touching the target. Each one counts by what's on it and by the angle between that tile and the shooter:
| On the next tile | Cover | Path cost |
|---|---|---|
| Wall, closed door, other full-height building | 75% | impassable |
| Sandbags or barricade | 55% | 42 |
| Stone chunk | 50% | 42 |
 Autocannon or uranium slug turret | 50% | 50 |
| Mini-turret | 40% | 50 |
 Fence | 25% | 80 |
| Open door | 0% | — |
That full value only applies when the cover tile is almost exactly between the target and the shooter (within 15°). It drops to 80%, 60%, 40% and 20% of the value as the angle grows, and to nothing at 65°. Diagonal neighbours count their angle 1.75 times, so they fade faster. Shooting from close up also cuts cover: to a third when the shooter is under 1.9 tiles from the cover tile, two thirds under 2.9.
What that means for the exit
A raider standing in the doorway has wall on both sides and nothing in front. Against your shooters:
- Within 25° of straight ahead: 0% from the walls.
- 30° off: 15%. 45° off: 30%. 60° off: 45%.
- Beside the opening (past 75°): the full 75%. At exactly 75° it is still 60%.
These figures assume the shooter is at least 2.9 tiles from the wall tile; closer than that, the cover drops to two thirds, and under 1.9 tiles to a third.
So a firing line set up along the wall next to the doorway is the worst place to stand: every raider who reaches the door gets 75% cover against it. Put the line straight across. In the example layout the shooters stand 9 tiles from the doorway and up to 3 tiles to either side, about 18° at most. The tile one step back inside the tunnel has diagonal walls in front of it, which gives a raider up to 30% against those outer shooters, so the narrower the line, the better.
Once a raider steps out of the doorway into the room there's no wall next to them. Keep it that way: every chunk, sandbag or turret you leave in their half of the room is a place to stop.
Raiders won't enter the killbox
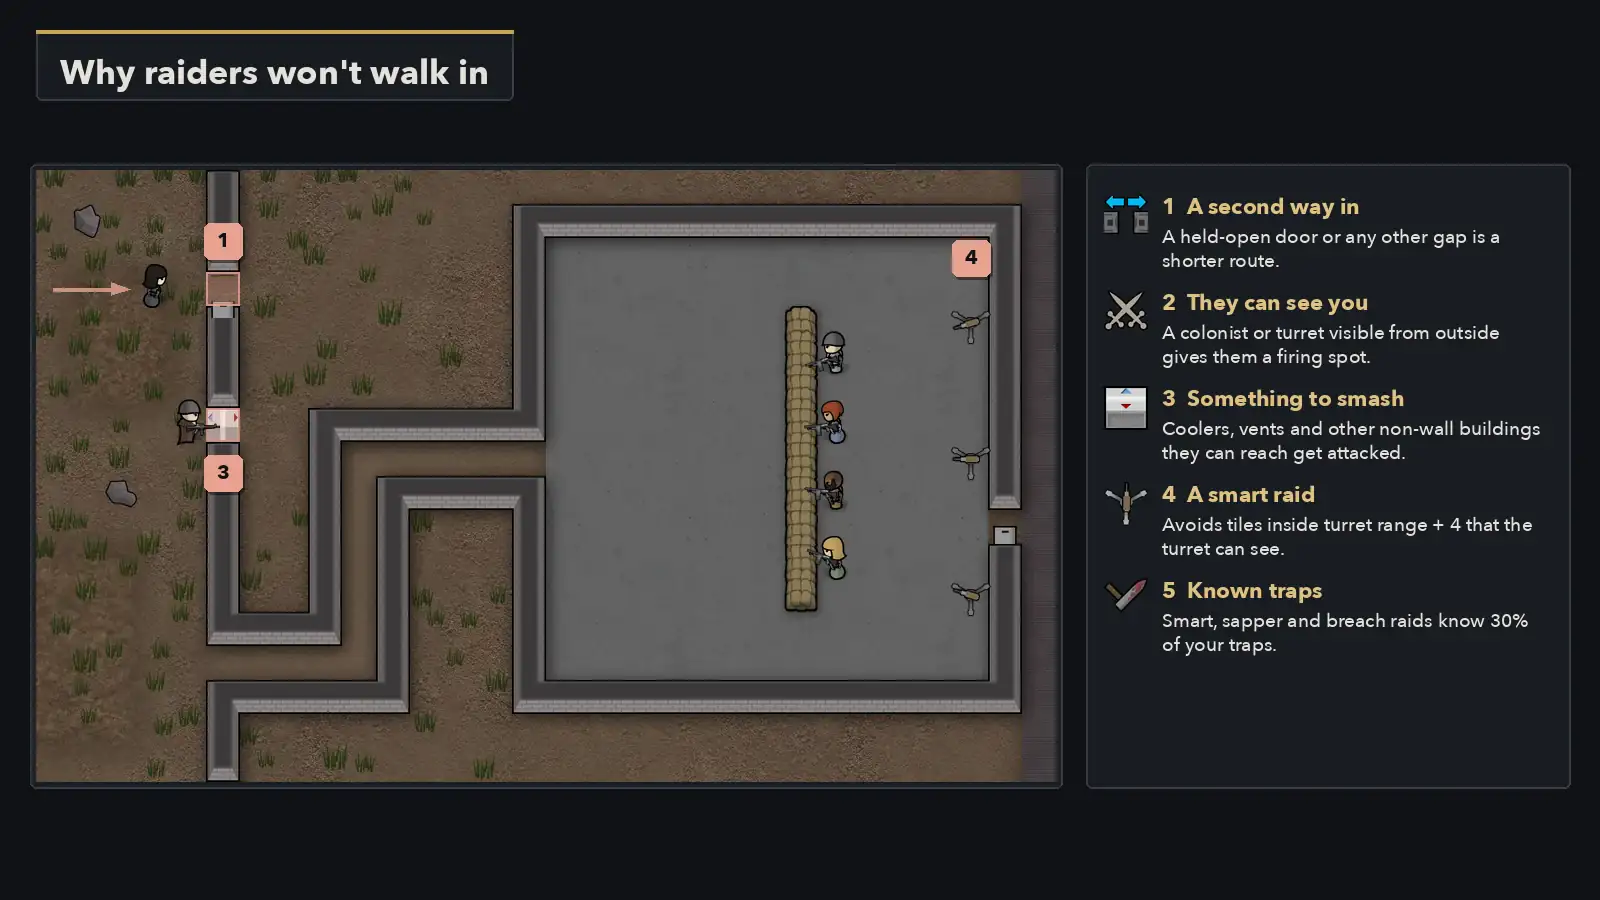
An assault raid works down a priority list: shoot anything it can hit, smash buildings it can reach, walk toward the nearest colonist it can reach, and only then start on walls. A killbox only works when everything above "walk toward a colonist" comes up empty outside the box.
- A second way in. A door on hold open or a missing wall tile anywhere on the perimeter is a route, and raiders take the shortest one.
- They can see someone. If a colonist or turret is visible from outside, raiders find a firing spot outside and stay there. Check for windows of open floor, held-open doors and gaps at the room corners.
- Something to smash. Walls, doors, sandbags, fences and conduits don't count, but coolers, vents, lamps, solar panels and most other buildings do. A cooler set into the outer wall is reachable from outside, and raiders will stop to wreck it, and then use the hole.
- A smart raid. Smart, sapper and smart breach raids treat every tile within a turret's range plus 4 that the turret can see as dangerous. They add heavy path cost there and avoid those tiles as firing spots. A turret that can see straight down your tunnel tells them to look for another way.
- Known traps. The same smart raid types already know 30% of your traps.
- No route at all. If every route is sealed, raiders don't line up at one door. They spread out and start breaking walls and doors.
- The raid type. Sappers and breachers aren't looking for your entrance. See below.
Raiders who can't get anywhere don't wait forever. A normal assault gives up and leaves after about 10 to 15 in-game hours.
Build an early killbox before you own a turret
You don't need power, research or components for this one. Spike traps, fences, sandbags and walls are all available from day one. Spike traps need Construction 3.
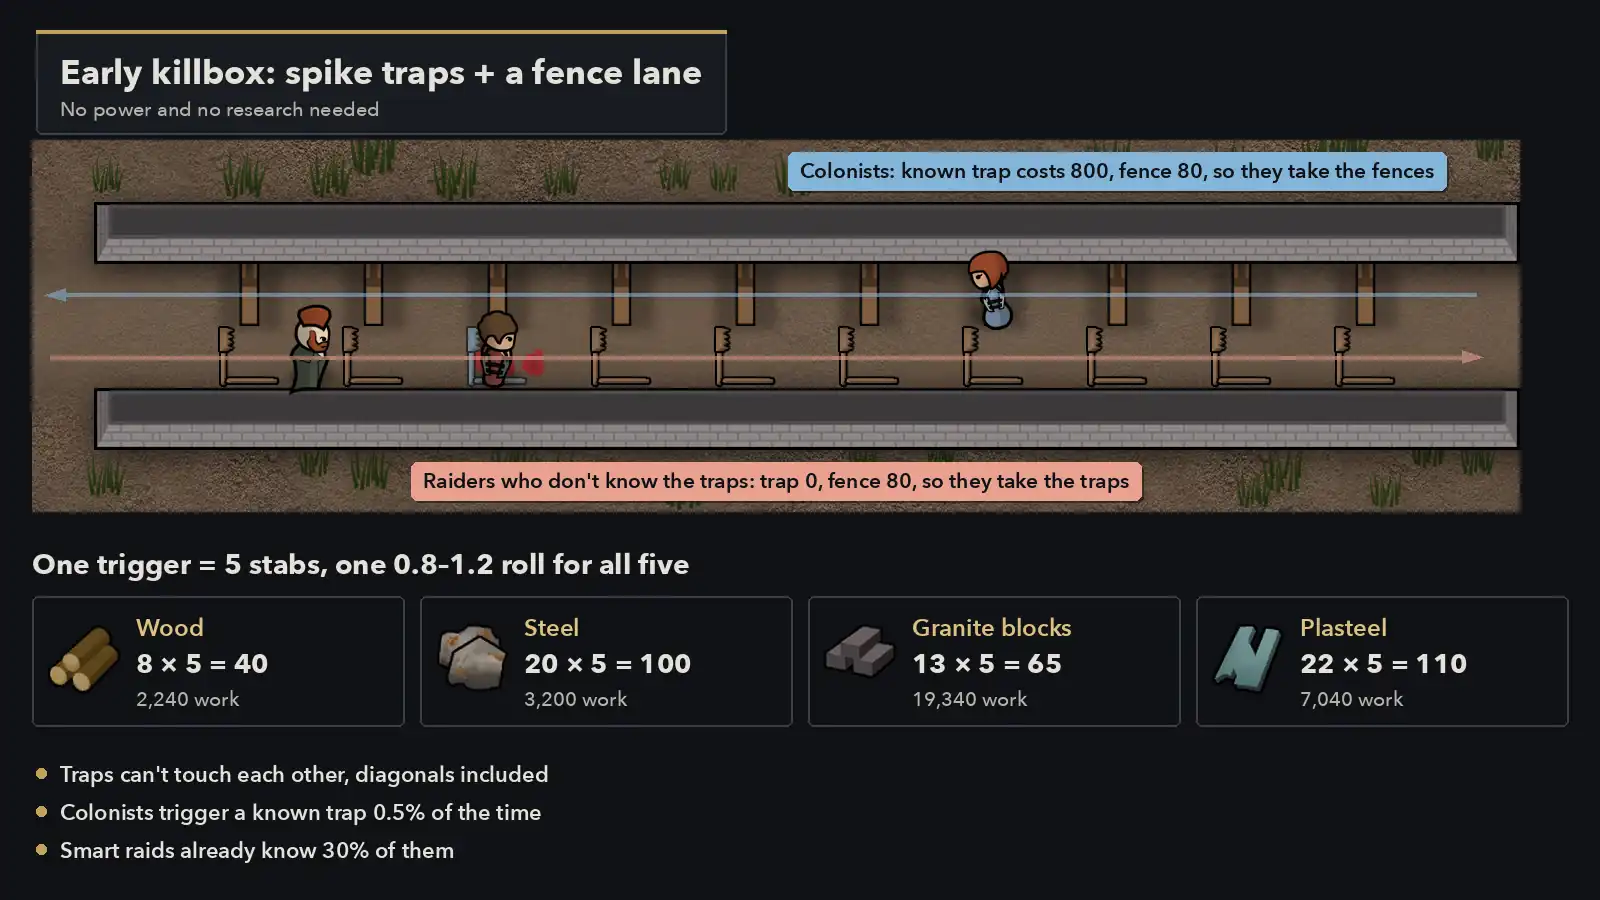
The trap and fence lane
- Build a corridor two tiles wide as the only way in.
- On one side, a spike trap every other tile. Traps can't touch any other trap, diagonals included, so every other tile is the densest you can get.
- On the other side, a fence next to each trap, with the tiles between them left open.
Why it works: a raider who doesn't know a trap sees it as an ordinary floor tile, and a fence costs 80 to step into, so they walk the trap side. Your colonists know every trap. To them a trap tile costs 800, so they take the fence side and step on a trap only if there's no other way. Even then a known trap springs only 0.5% of the time. Leaving gaps between fences matters: fences in an unbroken row only slow a pawn once, on the first one.
Spike trap numbers
A trap stabs 5 times when it springs. Each stab does 20 × the material's sharp damage multiplier, with one 0.8–1.2 roll applied to all five. The info card shows the per-stab figure.
| Material (45 each) | Per stab | Per trigger | Work to build |
|---|---|---|---|
 Wood | 8 | 40 (32–48) | 2,240 |
 Steel | 20 | 100 (80–120) | 3,200 |
| Granite blocks | 13 | 65 | 19,340 |
| Limestone, slate, marble blocks | 12 | 60 | 17,740–19,340 |
| Sandstone blocks | 10 | 50 | 16,140 |
 Plasteel /  uranium | 22 | 110 | 7,040 / 6,080 |
Every trap is used up when it springs. Traps built in your home area start with auto-rearm on, which drops a rebuild blueprint in the same spot, so each trigger costs another 45 material and the full work again. Steel is the best value for most colonies; stone traps take roughly six times as long to build as steel.
Who sets them off
| Who walks over it | Chance to spring |
|---|---|
| Raider who doesn't know it, manhunting animal | 100% |
| Raider in a smart, sapper or smart breach raid, for the 30% of traps they know | 0%: a trap their faction knows can't spring on them, and they path around it |
| Your colonists, slaves, tame animals | 0.5% |
| Calm wild animal | 20% |
| Wild man | 30% |
| Nimble pawn | × 0.1 on top of the above |
| Flying creature | never |
Once the colony grows, a big raid can eat 10 traps in seconds. Keep the lane as a slowdown in the outer tunnel and let the guns do the killing.
Size the lane for the guns you actually have
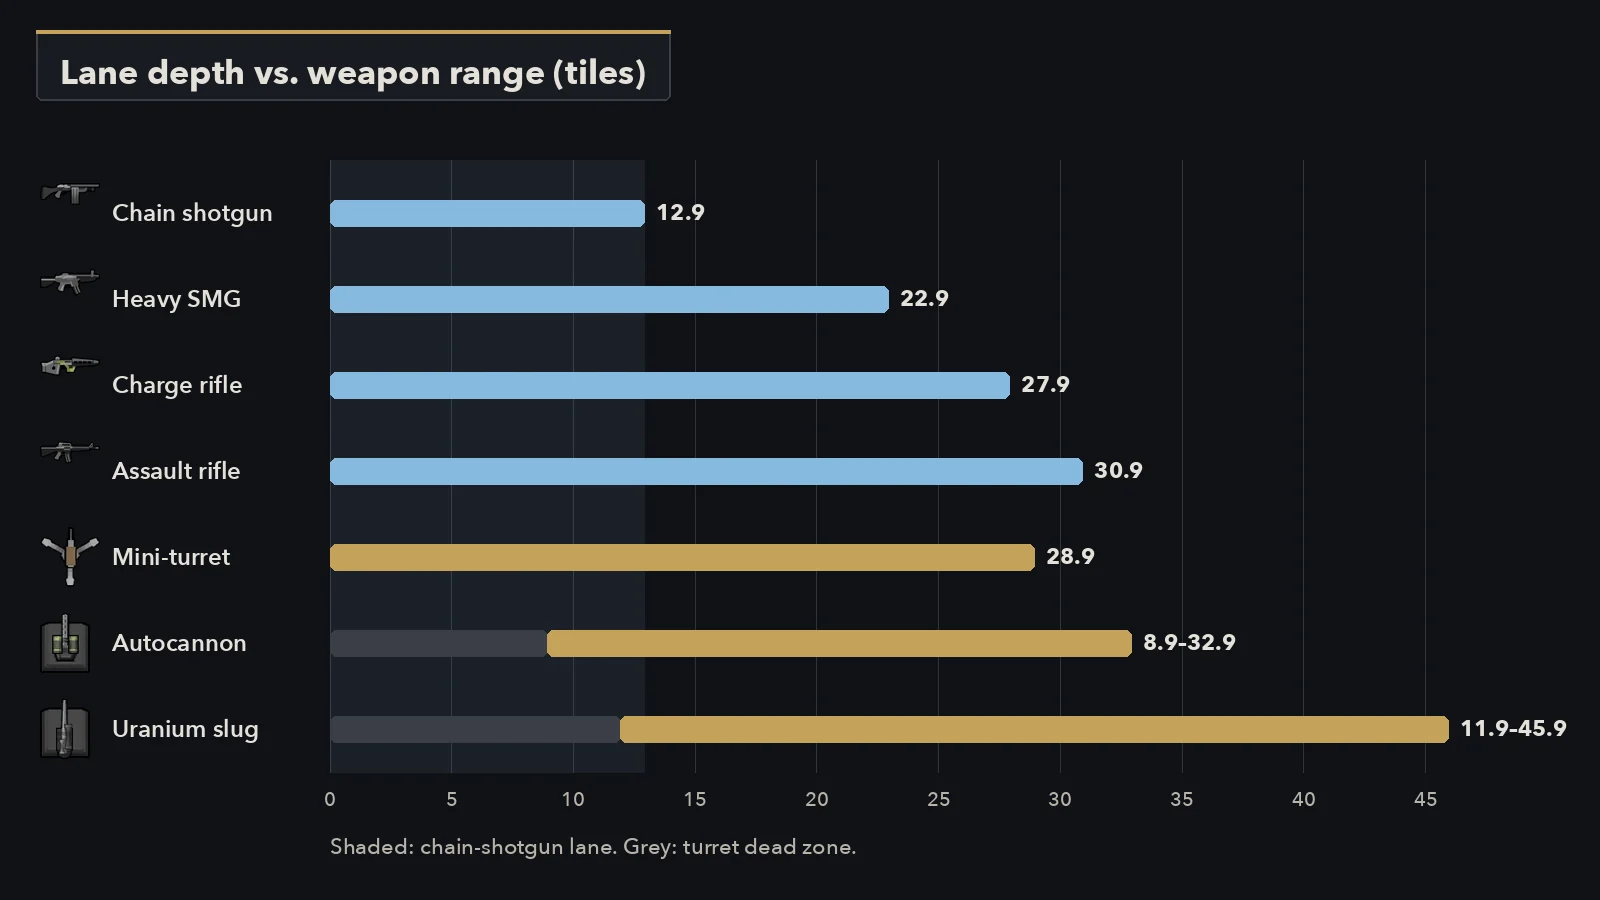
| Weapon | Range | Lane it suits |
|---|---|---|
 Chain shotgun | 12.9 | Shotgun tunnel, line 8–10 tiles from the doorway |
| Pump shotgun | 15.9 | Same, a little more slack |
| Heavy SMG | 22.9 | Medium room |
| LMG | 25.9 | Medium to long |
| Charge rifle | 27.9 | Rifle lane |
 Assault rifle | 30.9 | Rifle lane |
Shotgun tunnel
The compact version: a small room, the line 8 to 10 tiles from the doorway, chain shotguns (gas operation research, 70 steel + 5 components each). Everything that steps out of the doorway is in range of every shooter at once. It's the fastest build for a small colony and the easiest to fit indoors, but if your line is short of pawns the raiders reach you quickly.
Rifle lane
Once you have more shooters, armor and an autocannon behind the line, a deeper room with the line 15 to 20 tiles back gives you more seconds of fire before anyone reaches you. It needs more space and, because the firing line is wider at that depth, keep checking the 25° rule: at 18 tiles you can spread shooters about 8 tiles to each side.
Autocannons can't fire within 8.9 tiles and uranium slug turrets within 11.9, so in a shotgun-sized room they'll go quiet the moment raiders get close. Put them where the doorway is at least that far away.
Turrets that don't wipe out your own line
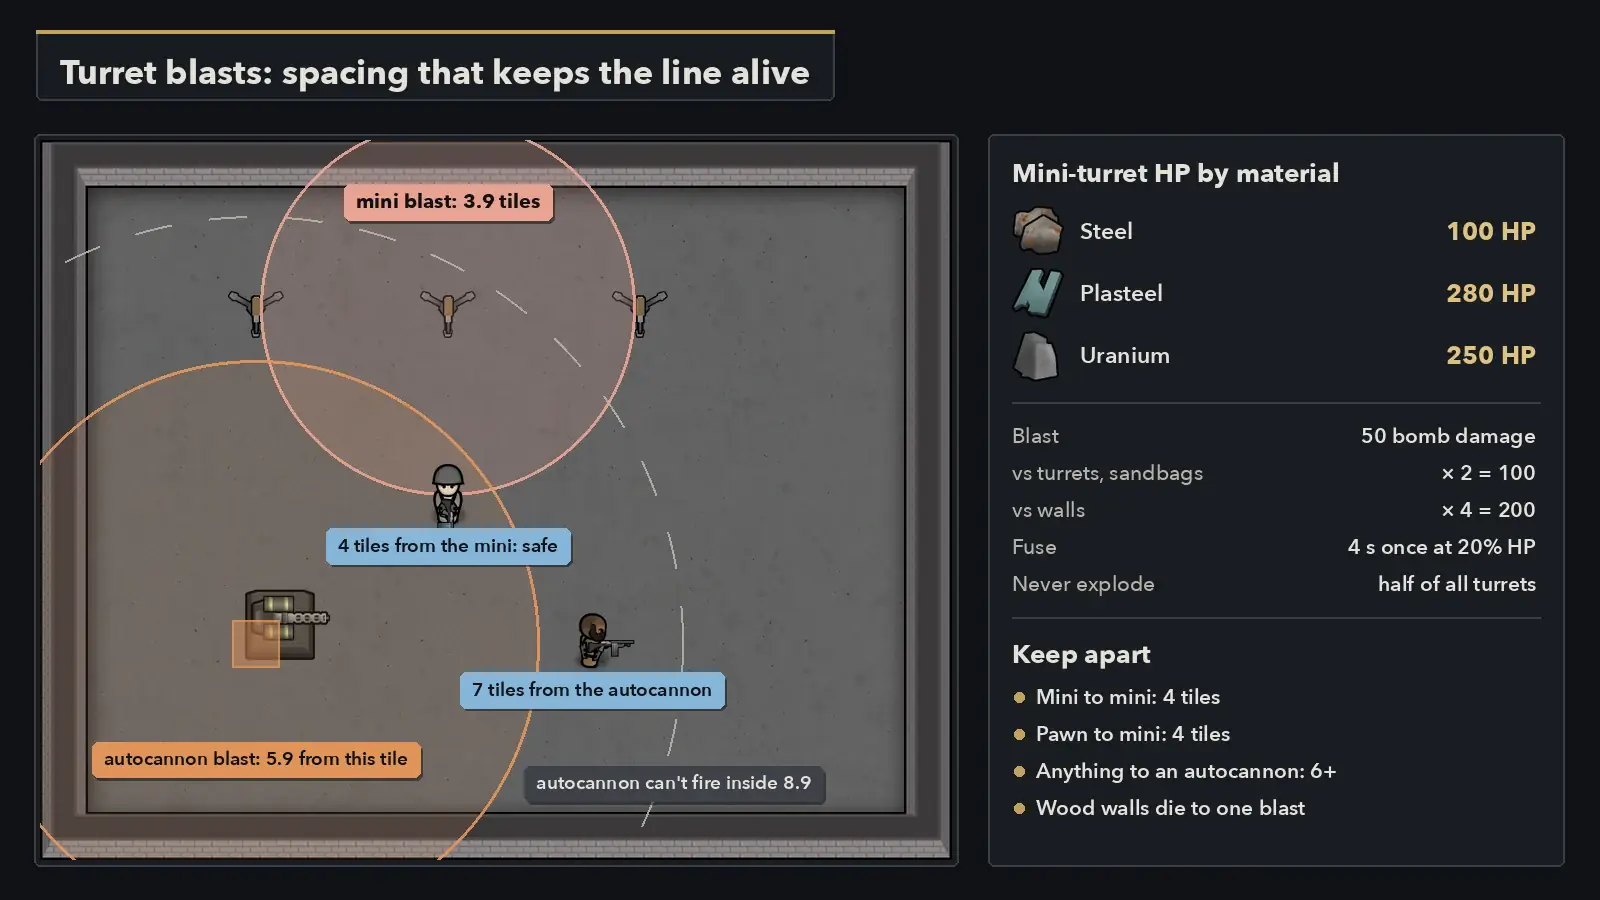
| Mini-turret | Autocannon |  Uranium slug | |
|---|---|---|---|
| Research | Gun turrets | Autocannon turret | Uranium slug turret |
| Cost | 30 metal + 70 steel + 3 components | 350 steel, 40 plasteel, 6 components | 300 steel, 30 plasteel, 60 uranium, 6 components |
| Construction skill | 5 | 6 | 6 |
| Hit points | 100 steel, 280 plasteel, 250 uranium | 380 | 380 |
| Power | 80 W | 150 W | 150 W |
| Range | 28.9 | 8.9–32.9 | 11.9–45.9 |
| Fire | 2 × 12 dmg, 4.8 s cooldown | 3 × 27 dmg, 3.5 s cooldown | 1 × 55 dmg, 3.2 s cooldown |
| Time per burst | about 5.2–5.9 s | about 4.3–5.1 s | about 3.5–4.2 s |
| Armor penetration | 18% | 40% | 82% |
| Refill | 80 steel per 60 shots | 180 steel per 90 shots | 60 uranium per 30 shots |
| Blast radius | 3.9 | 5.9 from the lower-left tile | 5.9 from the lower-left tile |
The cooldown starts after the burst ends. Before each burst the turret looks for a target (up to 0.25 s) and warms up for 0.25–0.75 s, which is why a full cycle runs longer than the cooldown. Damage figures are before armor.
Refill costs are the same on every difficulty preset. Only the maintenance cost slider in a custom difficulty changes them. Colonists top a turret up once it drops to half.
Blasts and spacing
Half of all turrets will never explode; which half is fixed per turret. The other half light a 4-second fuse once they drop to 20% hit points, or blow up at once if a single hit would destroy them. The blast does 50 damage to pawns, doubled to 100 against turrets, sandbags and other walk-over buildings, and quadrupled to 200 against walls.
- Mini to mini: 4 tiles (3 empty tiles between). A full-health steel mini caught in a neighbour's blast is destroyed. Plasteel and uranium minis survive one.
- Pawn to mini: 4 tiles. 50 damage before armor in one hit can maim an unarmored colonist.
- Anything to an autocannon or slug turret: 6 tiles from its lower-left tile. Full-health autocannons (380 HP) and plasteel or uranium minis survive the 100 damage; a steel mini (100 HP) doesn't. A pawn takes 50 blast damage before armor.
- Wood walls die to one blast (195 HP). Stone and steel walls hold.
Power, smoke and EMP
- Turrets draw power all the time. Switch them off between raids, or put the killbox on its own power switch.
- Turrets can't pick targets through smoke. A raid with smoke launchers can blind them for the push.
- EMP stuns turrets. Your own EMP grenades will do it too, so keep them out of the turret zone.
- A solar flare cuts power to every turret. Your colonists have to win that fight alone; see solar flare survival.
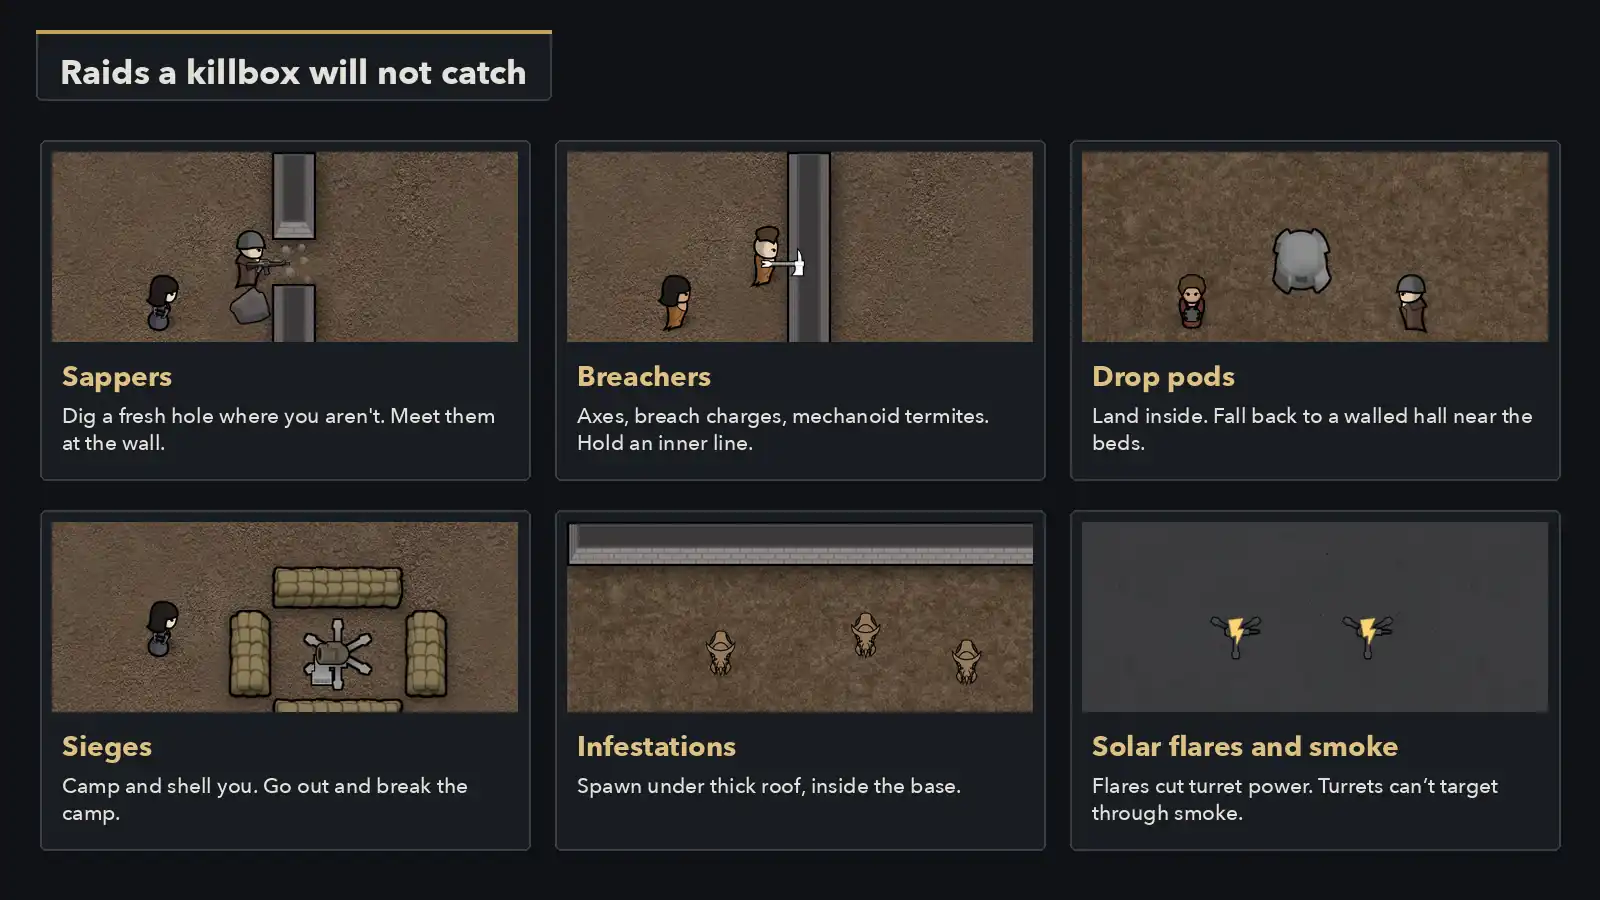
The raids a killbox won't catch
Sappers
They dig through walls on their own route. Watch where they're heading and meet them at the wall with your killbox team and grenades, before they're inside.
Breachers
Tribal breach axes, breach charges and mechanoid termites knock a hole through the wall. Termites are in the base game, no DLC needed. Hold an inner line; against termites bring EMP.
Drop pods
Pods can land in the middle of the base. Keep a short, walled fallback hall near the bedrooms with cover for your side only.
Sieges
They build a camp and shell you with mortars. Sitting in the box loses. Go out and break the camp, or answer with your own mortars.
Infestations
Insects spawn under thick overhead mountain, already inside. See infestation defense.
Mech clusters
Royalty clusters sit and wait. The box won't help; see beating mech clusters.
Manhunting animal packs do use the box. They head straight for your colonists, and they spring every trap they step on.
Heat boxes, slug lanes, and other variants
- Heat box. A fully roofed, closed room of stone or steel that raiders walk into, which you then set on fire using fuel you placed inside, such as wood. The roof and closed walls keep the heat in; an unroofed tile, an open door or a vent lets it escape. Raiders take burns and heatstroke. It needs non-flammable walls, your own colonists out first, and a cleanup afterward. Anything lying in the flames burns, so keep fuel away from where raiders fall if you want the loot. Treat it as a trick for later, not a first killbox.
- Slug-turret lane. Uranium slug turrets are most accurate at long range and can't fire inside 11.9 tiles. They belong at the back of a long rifle lane or covering open ground, not in a compact shotgun room.
- Melee block. One tile of doorway held by your best melee pawns works against tribal raids. Ranged raiders just shoot the blockers.
- Gravships (Odyssey). The same rules apply on a ship. Space is the limit, so a shotgun room with a short tunnel fits best. Odyssey's hunter traps follow the same no-adjacent-trap rule as spike traps.
Killbox planner
Enter your weapon, where your line stands, and your traps and turrets. The planner checks range, doorway cover, trap damage and cost, and turret spacing.
Older guides, DLC, console, and mods
- Pre-1.6 exits. Sandbag or fence lines across the end of the tunnel, and "barricade the corner" advice, come from before raiders could shoot from walk-over objects. They now give the raider a stopping spot with cover.
- Mini-turret stats. Some pages still list 120 HP or a 25-tile range. Current minis are 100 HP in steel and reach 28.9.
- Anomaly. Revenants, sightstealers, nociospheres and fleshmass nuclei never trigger traps. Bioferrite spike traps hit for 130 per trigger.
- Odyssey. Obsidian spike traps hit for 140 per trigger. Hunter traps need Hunter drones research.
- Console. These numbers are for PC 1.6. Check a sandbag tile in your own game before you rely on the 1.6 exit behavior.
- Mods. Combat Extended and other ballistics mods change cover, ranges and armor, and security mods add embrasures. Everything here is vanilla.
Quick answers
Do killboxes still work in RimWorld 1.6?
Yes, against normal assaults. Leave the exit bare, since raiders can now shoot from sandbags, and put your shooters straight across from the doorway.
Why do raiders shoot from the corner?
The wall beside them is cover against shooters off to the side: 30% at 45°, 75% from beside the opening. Shooters within 25° of the tunnel line give them none.
Why won't raiders enter my killbox?
A shorter route, a colonist or turret they can see from outside, a cooler or other building to smash outside, or a sapper, breach or smart raid.
How do I make a killbox before turrets?
A two-wide corridor: spike traps every other tile on one side, a fence beside each trap on the other. No research needed.
How far apart should turrets be?
Minis 4 tiles apart and 4 from pawns. Anything fragile 6 tiles from an autocannon's lower-left tile.
Do spike traps work on smart raids?
They know 30% of your traps and walk around those. The other 70% still work.
What raids ignore a killbox?
Sappers, breachers, drop pods, sieges and infestations. Solar flares and smoke shut down or blind turrets.
How deep should a shotgun killbox be?
Line 8 to 10 tiles from the doorway. Chain shotguns reach 12.9.