Stop Dying to Every Raid: RimWorld Combat & Defense That Actually Works
Stop Dying to Every Raid
Protect Your Colony with Effective Strategies, Weapons, and Tactics
Updated for RimWorld 1.5
Raids, mechanoid assaults, and mad animals – RimWorld throws countless threats at your colony. How can you survive? In this guide, we'll walk through proven combat and defense strategies to keep your colony safe on mid-to-high difficulties. You'll learn how to design killboxes (and alternatives), arm your pawns with the right weapons, and handle special threats like breachers and infestations. (Spoiler: Preparation is everything!) New to RimWorld? Start with our beginner's survival guide first. By the end, you'll be ready to face Randy or Cassandra at 500% with confidence.
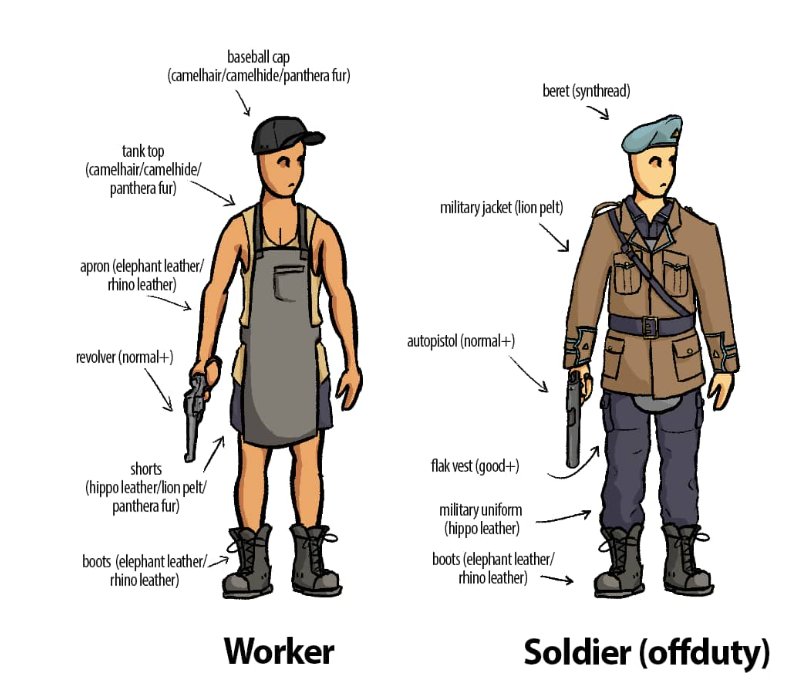
Worker Soldier (offduty) - Even your workers need to be ready for combat
Need a quick primer instead? Jump to our RimWorld Quick Start Guide for a fast rundown. For advanced late-game strategies, check our endgame survival guide.
Contents
Common Colony Defense Challenges (Pain Points)
Every RimWorld player has a story of a colony wipe – often it comes down to the same pain points. Let's identify these common defense challenges, so you know what to watch out for and address them early:
Early-Game Vulnerabilities
In the very beginning, your colony is fragile. You might have just a couple of revolvers or bows and maybe a wooden wall perimeter (if that). Early raids are small, but even one or two raiders with knives can cause disaster if you're caught unprepared.
The pain point: lacking any defenses – no walls, no cover, not even a couple of traps – means even a lone raider can walk right up to your door.
In these initial days, focus on securing a choke point (e.g. a door or gap in a wall) and craft at least basic weapons. Even a short stone chunk wall with a pawn hiding behind it can save your life by providing 75% cover.
Mid-Game Mistakes (Overextending and Wealth)
As your colony grows, new dangers emerge. Many players in mid-game suddenly face a raid of 15 tribals or a pack of manhunting rhinos and think "Where did THAT come from?!"
The answer is often wealth. RimWorld's storyteller increases raid strength as your colony's wealth and population rise.
Another mid-game pain point is overextending your base – having multiple entry points or buildings far from each other. Start consolidating and fortifying. Build perimeter walls to funnel attackers. Keep an eye on your wealth; if you notice raids getting bigger fast, maybe hold off on that massive gold statue and invest in gun turrets or better weapons first.
Late-Game Threats (Overwhelming Raids and Special Enemies)
In late-game, the gloves come off. Cassandra Classic or Randy Random can throw huge pirate raids (dozens of well-armed raiders), combined arms of mechanoids, or relentless waves during the endgame ship launch.
A common pain point here is getting overwhelmed – even a good killbox can fall if 50+ enemies rush in with Doomsday rocket launchers and shield belts.
The key late-game pain point is usually complacency – e.g. relying on the same defense that worked in mid-game without upgrading it for late-game scale. To address this, upgrade to plasteel traps, multiple fallback kill-zones, and have specialized weapons ready to go.
One-Strategy Reliance ("All Eggs in One Basket")
Another broad pain point is relying too much on a single defense strategy. RimWorld is infamous for the "killbox mentality," where players funnel all raids into a single trap-laden, turret-filled box.
The pain point here is inflexibility: if your entire plan is one big kill tunnel and suddenly a raid lands inside your base, you're in trouble.
Diversify your defensive tactics. Have a Plan B for when Plan A goes wrong. Throughout this guide, we'll address multiple approaches – so you won't be helpless if, say, your killbox gets circumvented or you choose not to use one at all.
Designing Your Base for Defense (Base Layout & Killboxes)
Base design is your first line of defense in RimWorld. A well-designed base can make even a huge raid manageable, while a poor layout might get you overrun by a handful of pirates. In this section, we'll cover how to shape the battlefield to your advantage – from simple walls to the infamous killbox.
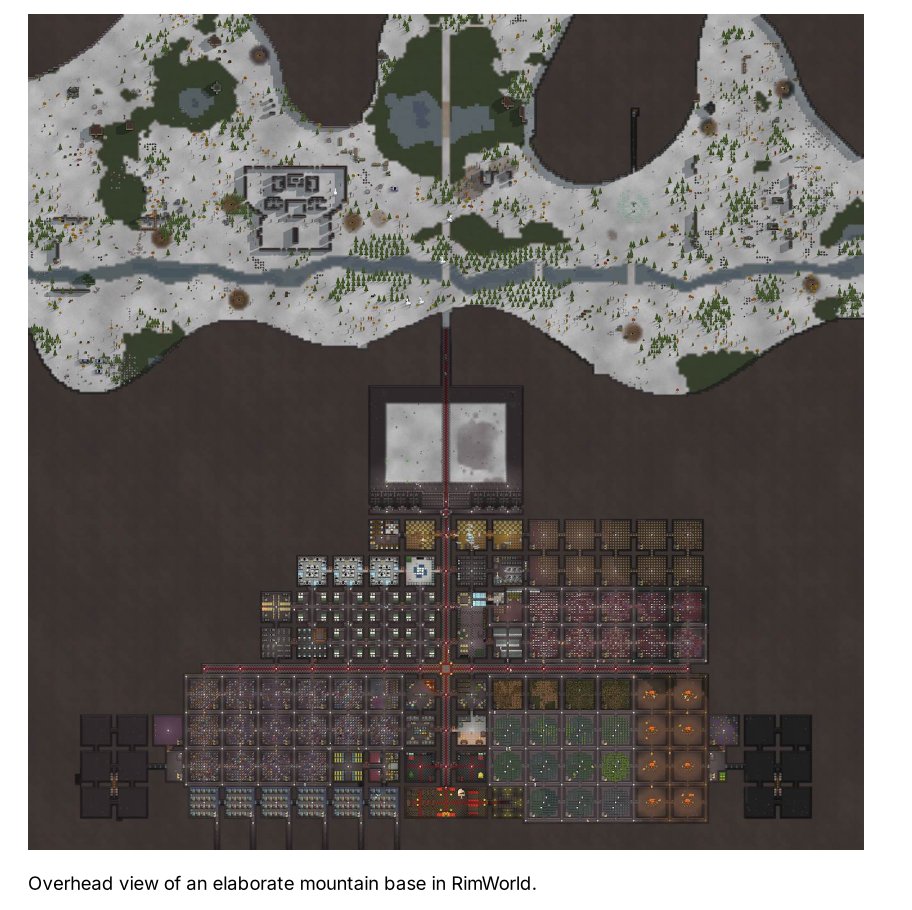
Overhead view of an elaborate mountain base - Notice the strategic positioning and defensive layout
Perimeter Walls and Choke Points
The most fundamental defensive design principle is funneling attackers. In RimWorld, raiders generally take the path of least resistance toward your colony. You can use this against them by building a perimeter wall around your base with only one opening.
TIP: Consider double-thick walls around your perimeter. This is especially important if the entry is far from some raid spawn points. Double layers of wall make raiders almost always choose the open door instead.
In summary, encircle your base (even if it's just a wooden wall at first) and leave one planned way in. That funnel is where you'll concentrate your defenses.
Killbox Basics: Creating a Deadly Funnel
When players talk about RimWorld defense, "build a killbox" is advice you'll hear 100 times. So, what is a killbox? It's a designated area (usually just outside your base entrance) where you massacre incoming enemies with minimal risk to your colonists.
Key elements of a classic killbox:
- A narrow tunnel entrance (3-5 tiles wide typically) often lined with traps or slowing devices
- An open killing zone (the "box") where you have line of fire on enemies as they come in
- Cover for your colonists at the back of the killbox (walls are best - 75% cover)
- Optional turrets as bait and DPS (be careful to space them to avoid chain reactions)
One thing to note: in 1.5 there were no fundamental AI changes to how raids handle killboxes. So the traditional designs still work well. However, one particular exploit design, the "singularity killbox," was nerfed.
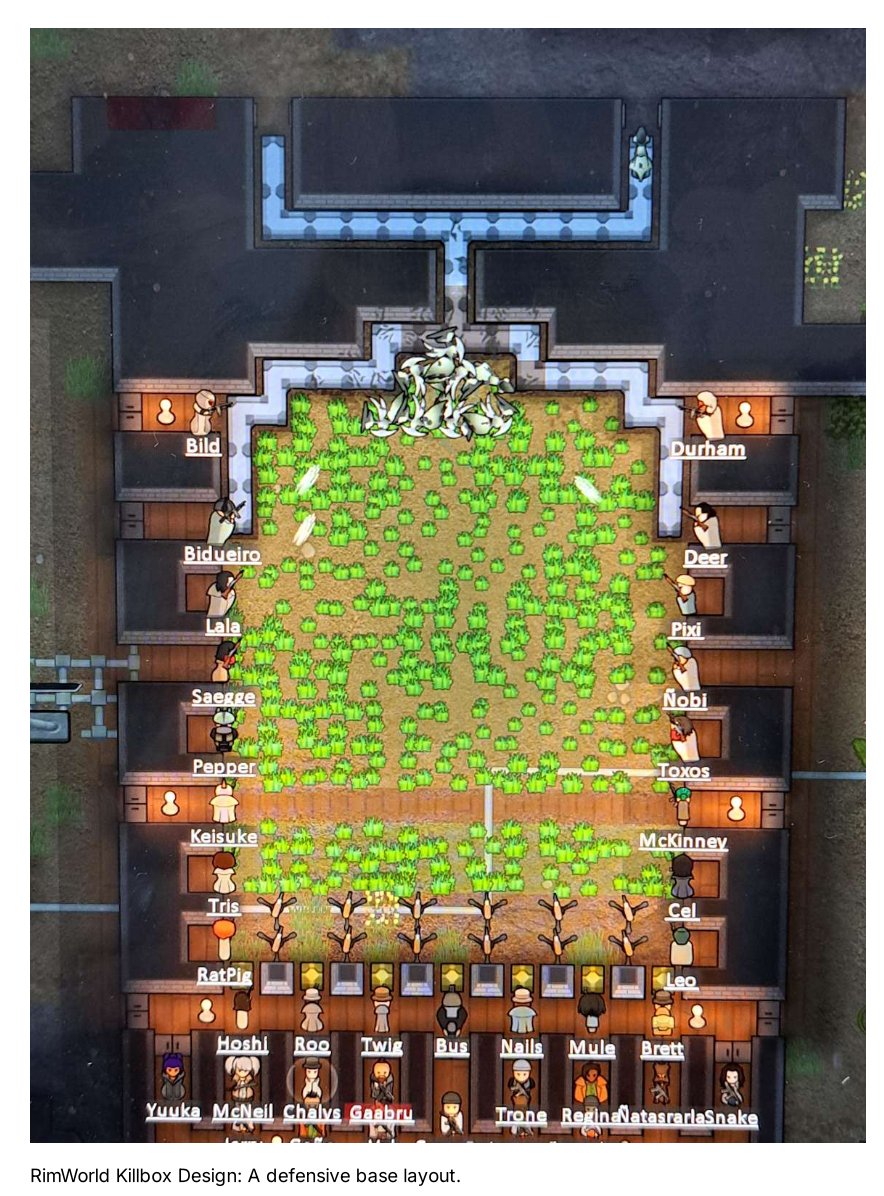
RimWorld Killbox Design: A defensive base layout - Perfect example of trap placement and firing positions
Trap Corridors and "Killhalls"
Maybe you're low on guns and manpower early on – traps can pick up the slack. A trap corridor is a simple structure: a narrow hallway packed with traps that raiders must path through to reach you.
Designing a trap corridor: Make it narrow (1 or 2 tiles wide) and long enough to fit multiple traps staggered. If the corridor is 2-wide, use a checkerboard pattern, or just every other tile if 1-wide.
A killhall is basically an extensive trap corridor that leads into a killbox. In the advanced design shown earlier, the killhall had two "open" doors that let raiders in and out, but in between is a 3xN maze of straw matting and an unpowered turret as bait. The player would shoot a molotov into this trap maze, setting the straw floor on fire and creating an instant oven.
Fallback Positions and Interior Defense
No matter how good your external defenses are, sometimes enemies get inside. Maybe sappers breached a side wall, or drop pods landed directly in your greenhouse. Having interior fallback defenses can save your colony in dire moments.
Consider building your base with a few defensible locations inside:
- Interior Sandbag Lines or Barricades: You could have sandbags in hallways or a "last stand" room where remaining colonists can make a final stand if the killbox is overrun.
- Doors as Flow Control: Use doors inside to split up enemies. If a wave of raiders gets in, you can retreat through doors and close them to isolate a few raiders at a time.
- Turrets in the Courtyard: If you have the resources, an extra turret or two inside your base can stop a surprise breach from turning into a massacre.
- Escape Routes: Plan at least one emergency exit out of your base that's not the main entrance.
RIMWORLD WISDOM: Think of base defense like an onion: layers. If outer layers fail, your inner layers give another chance.
Effective Combat Tactics (How to Fight Smarter)
Even a perfect defensive layout needs good execution. This section dives into combat tactics: how to position your pawns, use cover, and micromanage in battles to minimize losses.
Use (and Understand) Cover
Cover is life in shootouts. In RimWorld's combat system, each object between a shooter and their target can provide cover, which is essentially a chance for the shot to hit the cover instead of the target.
- • Walls provide 75% cover
- • Sandbags and barricades give 55% cover
- • Even rock chunks give around 50% cover
Always fight with cover whenever possible. The simplest tactic: have your colonists peek out from behind walls. RimWorld pawns will automatically "lean" around a wall or corner to shoot, exposing themselves only briefly.
Tip: Build short perpendicular walls ("corners") along your perimeter or killbox firing line. These act as personal cover spots for your gunners. A common setup is alternating wall, sandbag, wall, sandbag along a line.
On the other hand, don't give enemies cover. If a raid is approaching and you have random junk (like chunks, fences) in front of your base, consider clearing it. Raiders will absolutely plop down behind a rock chunk 30 tiles from your base and engage in a cover firefight.
Focus Fire and Target Priority
In a chaotic firefight, especially with dozens of pawns, it's easy to just let the AI shoot whoever. But a bit of manual targeting can eliminate enemies faster and reduce the damage you take.
Focus fire: Concentrate your shooters on one target at a time (especially high-threat targets). For example, if a raid has a guy with an incendiary launcher waddling in, manually order 5 of your colonists to all target that guy.
High-priority targets to eliminate first:
- Grenadiers (frag or EMP grenades can wreck clumped colonists or shut down turrets)
- Rocket launchers (Doomsday or Triple – they do massive AOE damage)
- Shield-belt melee rushers (need focused fire to break their shields)
Micromanagement Tricks ("Cheese" vs. Tactics)
RimWorld combat can be micromanaged heavily – sometimes to a point of exploiting AI behavior. We'll cover a few tricks here and note which ones are considered "cheese" (using the AI's limitations unfairly).
Door Peek / Door Spam
This tactic involves a pawn using a door as cover in an extreme way. You have a shooter stand just behind a door. They open the door, take a shot, then immediately force-close it. Enemies won't have time to shoot back effectively.
Kiting
If you have faster pawns (say someone with bionic legs or a jogger with no armor to slow them), you can outrun melee enemies and keep shooting them while staying out of melee reach.
Baiting with "stooges" or animals
If you have tamed animals, you can use them to absorb a volley or two or to distract enemies. A common scenario: release some trained attack animals just as raiders round a corner.
Pulling Groups (Divide and Conquer)
If an enemy group is loitering (like siege parties or sapper groups before they breach), you can "pull" a few at a time. One method is to shoot a mortar shell or snipe one guy – sometimes a few will come chase you while others stay put.
Positioning Your Fighters (Melee in Front? Mixed? Etc.)
How you arrange your colonists during a fight can make a huge difference. Let's discuss a few setups:
Melee Blocking
A tried-and-true tactic is to put a melee pawn (with a shield belt ideally) at a choke point to hold off enemies while ranged pawns shoot from behind. For example, in a one-tile wide doorway, one strong melee pawn can block an entire horde, and your shooters behind fire over their shoulder.
This is especially useful against animals or melee-only raids. Just be cautious of friendly fire.
Lines and Spacing
If you have pure shooters, form a firing line with some spacing. Why spacing? Because of grenades and rockets. If you clump in a 2x2 area, one grenade landing there can injure everyone.
A common arrangement is a U-shape or L-shape: for example, some colonists behind sandbags, and a couple on the side flanking the entrance, forming a U around where raiders come in.
Retreat and Regroup
It's perfectly fine to fall back during a fight. For instance, if too many enemies pour into your killbox and your front liners are getting hurt, have a plan to pull them back to the next line of defense.
One effective move is a staged retreat: half your shooters move back while the other half cover, then they take positions further back and cover the rest retreating.
Weapons and Gear Guide (Arming Your Colonists)
What weapons should you give your colonists? Is a sniper rifle better than an assault rifle? Does armor actually help or just slow you down? In this section, we break down the arsenal: ranged weapons, melee weapons, armor, and utility items, along with recommendations for each stage of the game.
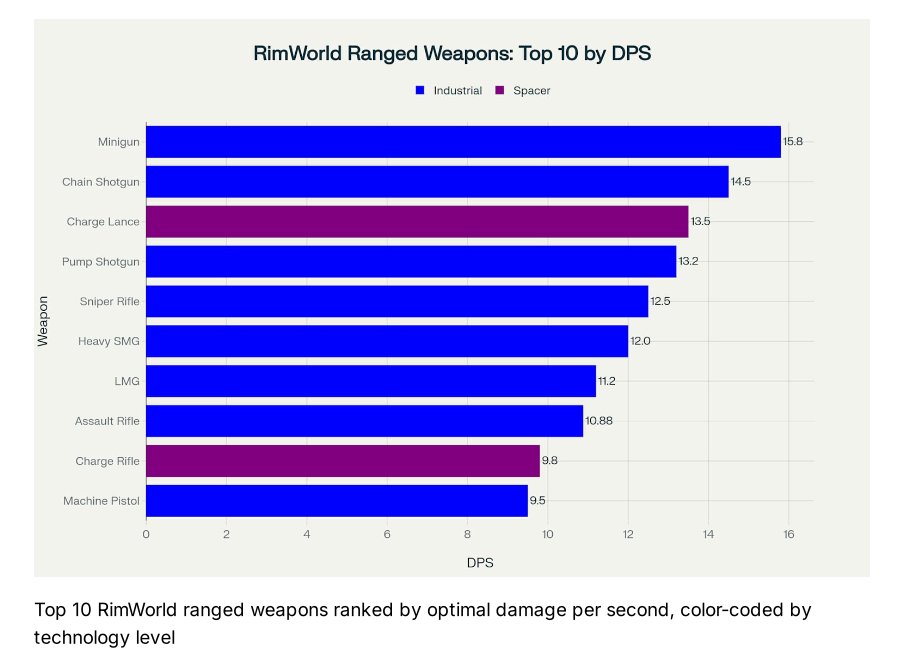
Top 10 RimWorld ranged weapons ranked by optimal damage per second, color-coded by technology level
Early-Game Weapons: From Sticks to Boomsticks
In the early game, you're often stuck with whatever you can scavenge or craft without a machining table. Common starting weapons include pistols, bolt-action rifles, revolvers, knives, and maybe a survival rifle if you crash-landed.
Revolver vs. Autopistol
Both are short-range sidearms. Revolvers hit a bit harder per shot and have better accuracy at range than autopistols, but shoot slower. Autopistols (machine pistols) have a higher rate of fire.
Best for: Low-skilled shooters (autopistol), patient shooters who aim carefully (revolver)
Bolt-Action Rifle (Survival Rifle)
This is a fantastic early weapon. It has decent range (37 tiles), good damage (18 per hit) and accuracy. A colonist with a bolt-action can often outrange pirates with pistols or shotguns and pick them off.
Best for: Your best shooter, hunting, and long-range engagements
Shotguns (Pump Shotgun)
The pump shotgun has high damage per shot at short range. It's deadly in close quarters – often a single blast can down a lightly armored target or at least blow off a limb.
Best for: Trigger-happy colonists, close quarters combat, ambushing around corners
Melee early on
For your melee colonists, a steel or plasteel knife is actually a strong choice because of how fast it hits (and armor penetration of plasteel). Clubs do blunt damage which is less lethal (could be good if you want prisoners).
Best for: Pawns with high melee skill or for anyone to defend themselves in an emergency
Mid-Game Firearms: SMGs, Assault Rifles, and More
By mid-game you likely have a machining table or have been looting raiders, so you'll start seeing higher-tier guns: heavy SMGs, assault rifles, sniper rifles, LMGs, etc. This is the phase where choosing the right gun for the right pawn matters.
Weapon Comparison Chart
| Weapon | Optimal DPS | Max Range | Best Use Case |
|---|---|---|---|
| Heavy SMG | ~12.3 DPS | 23 tiles | Close-mid range. Base defense, indoors; great for 5–10 skill shooters. |
| Assault Rifle | ~11.0 DPS | 31 tiles | Medium range all-rounder. Open-field fights & skilled shooters. |
| Chain Shotgun | ~18.7 DPS | 12 tiles | Very short range blitz. Killbox entrances, hallways, infestations. |
| Sniper Rifle | ~5.5 DPS | 45 tiles | Long-range precision. Pick off high threats before main fight. |
| Minigun | 36.8 DPS (theoretical) | 27 tiles | Crowd destruction at short range. Risky but huge impact on clusters. |
DPS values are "optimal" and assume all bullets hit – real-world DPS is lower due to misses.
RIMWORLD WISDOM: "Assault rifles are the meta weapon… nearly as much DPS in killboxes as others, but far superior if you need to fight outside"
Late-Game and High-Tech Weapons
Late-game introduces spacer tech and endgame gear:
Charge Rifle
This is the standard-issue spacer assault rifle. It has shorter range (26) than the normal assault rifle but higher damage per shot (3-shot burst of 15 damage each) and excellent armor penetration.
Best for: Your best shooters in most combat situations, especially against armored targets
Armor
By late mid-game you should have at least flak vests and helmets on everyone. In late-game, Marine Armor or Cataphract Armor (from Royalty DLC) become crucial.
These armors dramatically reduce damage. For example, a normal marine armor might give ~100% sharp protection, meaning many gunshots that hit will be halved or negated.
Utility Items
Shield Belts: Always equip your melee fighters with shield belts. A shield belt can absorb several shots before breaking.
Jump packs: Give unparalleled mobility for late-game fights. You can have a pawn with jump pack quickly go out and rescue a downed friend under fire.
Drugs and Consumables: Go-juice gives a moving and sight bonus, making your pawn faster and shoot better, plus pain reduction. Many players give their melee pawns go-juice before a big fight.
Turrets, Traps, and Turretless Defense
Turrets and traps deserve their own focus, as they are your static defenses that work so you don't always have to. But some players avoid turrets for a greater challenge or due to Ideology precepts. This section covers how to use turrets and traps effectively – and how to manage if you choose not to rely on them.
Turret Types and Placement
By mid-game you can usually build automated turrets. In vanilla (with Royalty DLC as well) the common types are:
Turret & Trap Quick Stats
| Defense | Range/Damage | Best Use |
|---|---|---|
| Mini-Turret | 25 range, moderate damage | Early-game defense, high numbers for volume of fire |
| Autocannon Turret | 30 range, high damage | Mid-late game, excellent vs. mechanoids |
| Uranium Slug Turret | 40+ range, very high damage | Late-game sniping, siege counter |
| Wooden Spike Trap | ~20-30 damage | Early-game, good against unarmored targets |
| Steel Spike Trap | ~40 damage | Mid-game standard trap, good vs most raiders |
| Plasteel Spike Trap | ~60+ damage | Late-game, can severely hurt even mechanoids |
Turret Placement Tips:
- Cover your turrets with sandbags or barricades on the sides so enemies can't easily approach and melee them.
- Separate power switches: Consider having turrets on a circuit with a switch so you can turn them off to save power.
- Space turrets at least 2-3 tiles apart so one explosion doesn't chain to the next.
- Baiting with Turrets: Raiders often target turrets first, drawing fire away from your colonists.
Trap Strategies: Materials, Layout, and Maintenance
Traps, especially spike traps, are an excellent passive defense. They cost no ongoing power, just some material and time to reset.
Key Trap Considerations:
-
Material matters:
The damage of a spike trap depends on the material's sharp damage. Wooden traps do the least (~20-30 damage), Steel traps do more (~40 damage), and Plasteel traps do a lot (~60+).
-
Spacing traps:
Avoid building traps adjacent to each other in the path if possible. If two traps are side by side, a single pawn stepping between might trigger both.
-
Maintenance:
After a raid, any sprung trap needs to be rebuilt (it's consumed on activation in vanilla). Ensure you have a stock of trap materials and a dedicated worker to reset them.
Playing Turretless (No Turrets, No Killbox?)
Some Ideology setups or personal challenge runs involve no turrets or even no formal killboxes. This is viable, but harder. How to manage:
Allies and Numbers
Without automated defenses, you rely entirely on your pawns (and perhaps animals). This often means you either keep colony wealth lower (to face smaller raids) or have more combat-capable colonists.
Mobile Tactics
Without static defenses, you might use guerilla tactics. For example, instead of bunkering in one spot, you can have colonists use the terrain around the base to fight in staggered skirmishes.
Psycast Heavy Strategy
Royalty DLC players who avoid turrets often lean on psycasters. Abilities like Berserk Pulse (causes multiple enemies to attack each other) can neutralize or thin out raids dramatically without a single turret.
PLAYER QUOTE: "Psycasts that people think are weak become very strong – Stun and Vertigo made 1 vs 3 fights possible in open field"
Dealing with Special Threats (Raid Types & Events)
RimWorld's storytellers keep things interesting by throwing varied threat events at you. This section breaks down common (and not-so-common) dangerous events and gives tailored tactics for each.
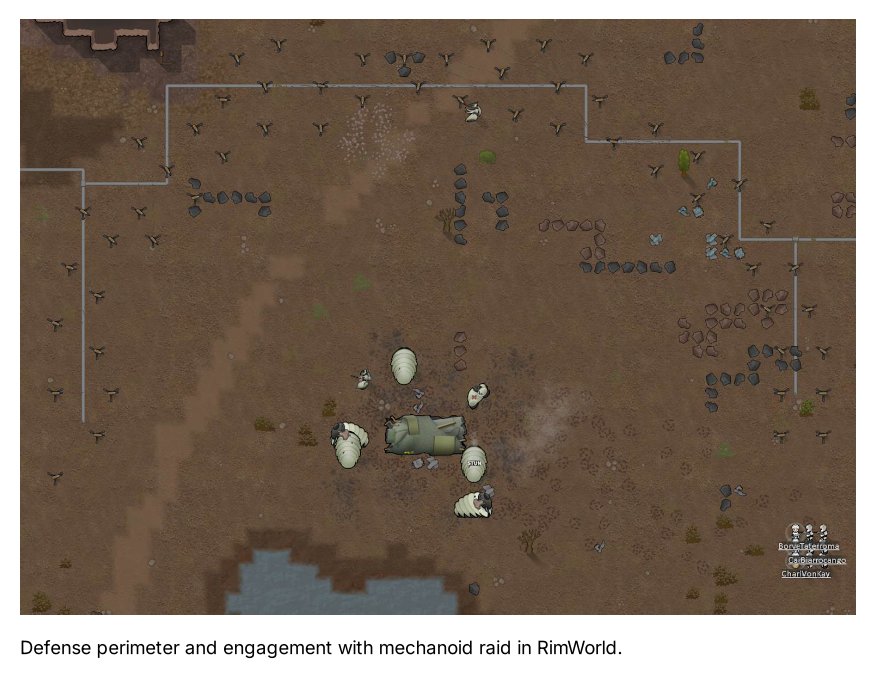
Defense perimeter and engagement with mechanoid raid - Notice the strategic positioning and coordinated response
Breach Raids (Sappers)
Breach raids are raiders that don't go for your front door. Instead, they target weak points in your walls or dig straight through to get at your juicy interior.
Counter strategies:
- Build double- or triple-layered outer walls
- Keep a mobile response team ready with EMP grenades
- Place traps at likely breach points
Drop Pod Raids
One of the scariest events: drop pod raids landing right on top of your colony. Suddenly, raiders crash through your roof or into your courtyard, bypassing all exterior defenses.
Counter strategies:
- Rally troops immediately to a safe spot near the drop zone
- Use interior doorways as chokepoints
- Send non-combatants to safety immediately
Sieges and Mortar Duels
Sieges are raids that don't attack immediately. Instead, raiders land with mortar supplies and start building sandbagged positions and mortars to shell you.
Counter strategies:
- Use your own mortars to hit their shell stockpile
- Use a sniper to harass them from max range
- Consider a direct assault if you have enough manpower
Mechanoid Clusters
Mechanoids are a late-game threat. Mech clusters are where a bunch of mech structures and units drop as a sort of mini-siege/encampment that doesn't attack immediately unless provoked.
Counter strategies:
- Use EMP weapons (grenades, launchers) to stun mechs
- Destroy shield generators first if present
- Use armor-piercing weapons (charge rifles, sniper rifles)
Infestations
If you have an underground or mountain base, infestations are a constant threat. They occur in areas under overhead mountain roof with temperature above -8°C.
Counter strategies:
- Design "infestation bait rooms" – small isolated chambers under mountain
- Use fire – insects hate fire and will flee from it if on fire
- Use the "Burn Box" method – cook bugs alive in a superheated room
Manhunter Packs
At times, the storyteller sends manhunting animals – could be anything from crazed rabbits to a pack of manhunting thrumbos. These animals will attack any human they see.
Counter strategies:
- Stay indoors – manhunters don't attack doors or closed bases
- Use your killbox if prepared – animals don't take cover
- Animals are susceptible to traps – they'll gladly trigger every trap one by one
Mixed or Unique Threats
Sometimes threats come combined or in unique scenarios:
-
Toxic fallout or volcanic winter during raids:
In toxic fallout, everyone outdoors not wearing protection gets toxin buildup. Raiders not smart enough to wear gas masks will eventually collapse from toxin if they wait too long.
-
Enemy using special weapons:
If you spot a raider with a triple rocket launcher, that becomes the special threat. All other tactics aside, you might charge that one guy with a sacrificial melee or focus-snipe him early.
-
Storyteller differences:
Cassandra sends predictable waves, Randy can chain weird combos (like two raids back-to-back or raid during a thunderstorm and a plague). Always keep a buffer in resources and energy for the unexpected.
Playing with DLCs and Mods
RimWorld's DLCs and mods can dramatically change your defense strategies. Here we'll explore how to leverage each official expansion and popular mods to enhance your colony's survival.
Royalty DLC Tactics
Royalty adds psycasts, permit-based reinforcements, and new threats.
Key defense enhancements:
- Berserk Pulse causes enemies to attack their allies
- Skip teleports pawns – great for repositioning or rescue
- Aerodrone strikes can decimate raid clusters
Ideology DLC Considerations
Ideology can create unique challenges and opportunities for defense through precepts and rituals.
Adapting to ideological restrictions:
- No turrets precept requires heavier reliance on pawns
- Combat Command role ability boosts combat effectiveness
- Weapon preferences can be challenging (e.g., melee-only)
Biotech DLC – Mechanitor Defense
Biotech adds mechanitor capabilities, allowing you to control your own mechs for defense.
Mech warfare advantages:
- Militors make excellent frontline defenders with mini-shotguns
- Heavy combat mechs can match or exceed centipedes in power
- Gene-modded super soldiers with combat genes create elite fighters
Anomaly DLC – Horror Elements
The Anomaly expansion adds horror elements and new ways to defend your colony.
New defensive options:
- Deadlife dust allows raising the dead ("shamblers") as a defensive army
- New anomalous items provide unique defensive capabilities
- Must also defend against new "fleshy" enemies that bypass typical killboxes
Essential Defense Mods
While vanilla RimWorld offers robust defense options, mods can enhance your capabilities significantly:
Combat Extended
Overhauls the entire combat system with realistic ballistics, ammunition types, and suppression mechanics. Makes combat more deadly and tactical.
Note: Incompatible with many other mods without patches.
Vanilla Expanded: Security
Adds a variety of new turrets, traps, and defensive structures while maintaining vanilla balance and feel.
Great for: Players who want more options without radical changes
RimWorld Multiplayer
Allows playing with friends in co-op mode. Coordinate defense strategies with real people instead of AI pawns.
Tip: Assign defensive roles to different players for maximum efficiency
Defensive Positions
Allows saving and loading preset positions for your colonists. Great for quickly mobilizing defenders to prepared spots.
Essential for: No-killbox playstyles that rely on mobile defense
Mod compatibility: Always check if mods work together before adding them to an ongoing colony. Combat mods especially can conflict with each other.
Conclusion - Surviving and Thriving
Congratulations – you've made it through this RimWorld combat & defense compendium! We've covered everything from laying out deadly base designs to outfitting your pawns and executing advanced tactics against every threat the Rim can throw at you. Now let's summarize the actionable steps and key takeaways:
Key Defensive Principles
- Assess and Improve: Walk through your colony's defense mentally. Do you have perimeter walls and a planned choke point? If not, build those now.
- Layered Defense: Implement the onion approach – traps outside or in tunnels, a killbox or guarded entrance, then interior safe zones. Don't rely on one line of defense.
- Arm & Armor Up: Ensure everyone has a decent gun or melee weapon. Prioritize getting flak vests and helmets on each colonist.
- Use Your Tools: Don't forget special tools like psycasts, drugs, and technology. A well-timed Berserk Pulse can make half a raid kill the other half.
- Expect the Unexpected: Train yourself to respond to surprises. By planning for each scenario ("If X happens, we'll do Y"), you remove panic from the equation.
A Tale from the Rim
In one of my toughest Cassandra runs, we had a mountain base with a central hall as our "last stand" area. One evening, a triple-whammy hit us – a mech cluster landed outside, while an infestation spawned in our rec room, and Randy (ever mischievous) triggered a solar flare knocking out our turrets.
Instead of despairing, we set our plan in motion: half the team rushed to barricade the rec room doors and torch the insects inside (yes, we lost an expensive pool table to fire, but it cooked those bugs). Meanwhile, our EMP grenadier and sniper carefully aggroed the mech cluster from a side tunnel – we lured the scythers into trap corridors, and EMP-stunned the centipede long enough to blast it with a DOOMSDAY rocket.
Next morning, we rebuilt, repaired, and actually mounted one of the centipede's busted inferno cannons above the dining room as a trophy. That night we cheered over insect jelly pudding and smoked meat, recounting how we triumphed against all odds.
The moral of the story? Preparation, adaptability, and a bit of daring can overcome RimWorld's worst events. It's incredibly rewarding to see your colony weather a storm of raids and come out stronger. You'll have war stories of your own – like the time a single colonist with a charge rifle held the line against 20 tribals, or when your killbox scorched an entire mech wave.
Now arm yourself (both in-game and with the knowledge from this guide) and go forth, survival strategist! Whether you prefer clever trap mazes or bold run-and-gun skirmishes, you have the tools to protect your colony and even turn the battlefield into your profit. Randy and Cassandra will surely keep testing you – but you're ready.
Good luck, and may your colonists shoot straight and your defenses never falter. Stay safe on the Rim!
Further Resources: If you'd like to delve deeper into specific aspects, check out RimWorld Wiki's Defense Tactics section for refreshers on cover mechanics.